Here is a dump of all of my notes from the CalTech Devops PGC certificate, they aren’t in any particular order. I will only be posting from the courses I found more relevant:
From Lesson 1-2
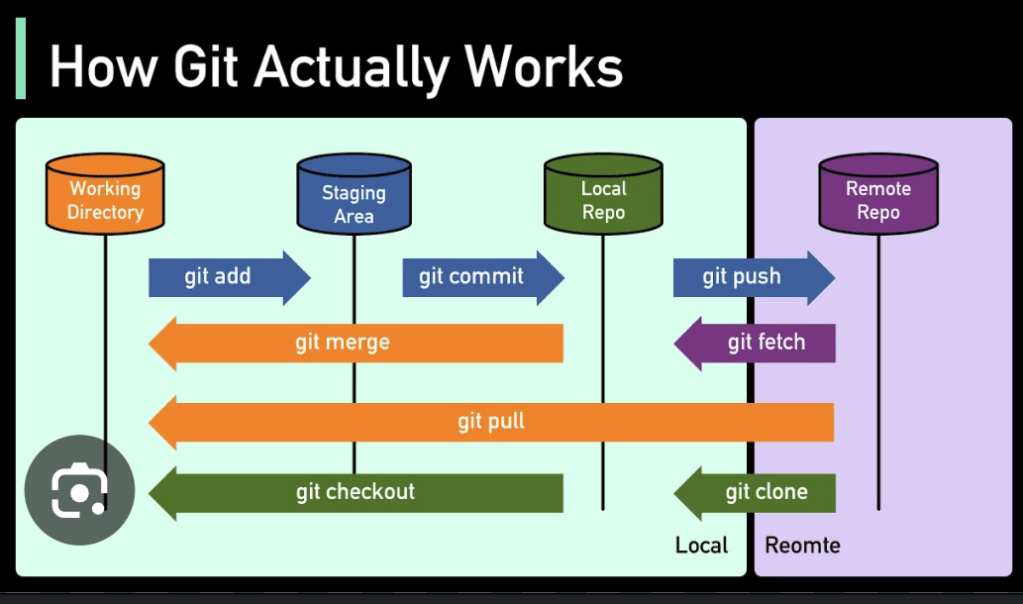
This first class through the CalTech/Simplilearn has basically been a refresher on Git, and an introduction to Jenkins. The certificate program has been ongoing for a number of months now, so I thought that I would go back through and make notes of the highlights from the course.
The first lesson we had was to To implement DevOps using GitHub to store a Java program and Jenkins to build consistent code packages, enabling continuous integration.
- Open a browser and navigate to Github.com then sign in
- Select “New” from the repository section
- From there, you want to name the repository “Test Repository”
- Check the “Add a README file” and then select “Create repository”
- Click on “<> Code”, then HTTPS, and finally copy the repository URL using the small boxes next to the lnik address
- From here, we need to add the Java program to the repository by making a folder then adding the file:
mkdir javacd javagit clone <URL>nano TestFile.java
7. Once we’ve added and opened the TestFile.java, we need to add the contents to the file:
public class HelloWorld { public static void main(String[] args) { System.out.println("Hello, World"); }}
8. After this, we need to initiate Git to add the file to the repo:
git init
9. Then, we need to add the file we just changed to git:
git add .
10. After that, we need to commit the files to the repo:
git commit -m “Add new files”
11. Now we need to add the files to the local repo
Note: While creating the remote repository, copy the HTTPS URL
git remote add origin <URL>
12. Push the changes to the remote repo using the following:
git push -u origin master
13. You’ll be asked to input your username and password, do this.
14. Now, you need to run the following command to check the status of the local repository:
git status
15. Visit Github.com and inspect the repo.
16. By following these steps, you’ve effectively demonstrated the process of pushing a file to a GitHub repository using Git commands for version control and collaboration.
Here’s a concise summary of the DevOps Foundations: Version Control and CI/CD with Jenkins – Advanced Git Concepts lesson:
From Lesson 3
Learning Objectives
By the end of the lesson, learners will be able to:
- Create and manage GitHub issues
- Set up upstream connections in Git
- Create and delete Git tags
- Use stashing and rebasing for collaboration and debugging
Advanced Git Operations Overview
1. GitHub Issue Tracking
- Purpose: Manage bugs, features, tasks
- Ways to Create Issues: From repo, code, comments, discussions, project boards, etc.
- Tracking Techniques:
- Create issues with clear titles/descriptions
- Assign users and labels
- Use milestones and project boards
- Communicate updates regularly
2. Upstream/Downstream in Git
- Upstream: Original repository (main project)
- Downstream: Forked or local copies
- Use: Sync changes between local and original repo via push/pull
3. Git Tags
- Types:
- Lightweight: Simple commit pointers
- Annotated: Include metadata (name, date, message)
- Operations: Create, list, push, delete
- Purpose: Mark releases or milestones
4. Branching vs Tagging
| Branching | Tagging |
|---|---|
| Moves with commits | Static markers |
| Used for development | Used for version/release points |
5. Git Stashing
- Temporarily stores uncommitted changes
- Allows switching branches without losing progress
- Commands:
git stash,git stash apply,git stash pop
6. Git Rebasing
- Integrates commits from one branch onto another for cleaner history
- Command:
git rebase(with options like--interactive) - Use case: Update your branch with main changes without merge commits
7. Undoing Changes
git revert: Creates new commit to undo a specific commit (non-destructive)git reset: Moves HEAD to a specific commit--soft,--mixed,--harddefine behavior
git rm: Deletes files from staging and working directorygit diff: Shows differences between states (working directory, staging, commits)git status: Shows current state of working directory and staging area
This lesson demonstrates how to set up and manage an upstream connection in Git to keep a forked repository in sync with the original repository.
Steps:
- Clone your fork:
- Use
git clone <your-fork-url>to copy your fork to your local machine. - Navigate to the repository directory with
cd <repository-name>.
- Use
- Add upstream remote:
- Add the original repository as the upstream remote using:
git remote add upstream <original-repo-url>
- Add the original repository as the upstream remote using:
- Verify remote:
- Check remote URLs with:
git remote -v
- Check remote URLs with:
Objective: Enable contributors to stay updated with changes in the original repo while working on their fork.
Tools: Git and GitHub

 Router-Cake
Leave a comment